Subscribe

RSS Feed (xml)

Powered By

Skin Design:
Free Blogger Skins

Powered by Blogger

Thursday, March 12, 2009

article : Know the General Rules for Using the Microscope

  1. Use light from a microscope lamp unless microscope has internal illumination.

  2. Adjust the condensor so that it is flush with, but not above, the stage.

  3. Place the specimen to be observed directly over the lens of the condensor.

  4. Focus first with low power. Bring down the objective to its lowest point (without touching the slide) and observe the slide as the objective is raised by rotating the course adjustment knob in a counter-clockwise direction.
Designed & Maintained by David M. Rollins
Copyright © 2000, D.M. Rollins and S.W. Joseph
Revised: August 2000
URL: http://life.umd.edu/classroom/bsci424

Read More......

article : Know The Gram Stain

The Gram stain is the most important and universally used staining technique in the bacteriology laboratory. It is used to distinguish between gram-positive and gram-negative bacteria, which have distinct and consistent differences in their cell walls. Gram-positive cells may become gram negative through mechanical damage, conversion to protoplasts, or aging, in which autolytic enzymes attack the walls.

In the Gram stain, the cells are first heat fixed and then stained with a basic dye, crystal violet, which is taken up in similar amounts by all bacteria. The slides are then treated with an I2-KI mixture (mordant) to fix the stain, washed briefly with 95% alcohol (destained), and finally counterstained with a paler dye of different color (safranin). Gram-positive organisms retain the initial violet stain, while gram-negative organisms are decolorized by the organic solvent and hence show the pink counterstain. The difference between gram-positive and gram-negative bacteria lies in the ability of the cell wall of the organism to retain the crystal violet.

Technique: Transfer a loopful of the liquid culture to the surface of a clean glass slide, and spread over a small area. Two to four cultures may be stained on the same slide, which can be divided into 2-4 sections with vertical red wax pencil lines. To stain material from a culture growing on solid media, place a loopful of tap water on a slide; using a sterile cool loop transfer a small sample of the colony to the drop, and emulsify. Allow the film to air dry. Fix the dried film by passing it briefly through the Bunsen flame two or three times without exposing the dried film directly to the flame. The slide should not be so hot as to be uncomfortable to the touch.

  1. Flood the slide with crystal violet solution for up to one minute. Wash off briefly with tap water (not over 5 seconds). Drain.


  2. Flood slide with Gram's Iodine solution, and allow to act (as a mordant) for about one minute. Wash off with tap water. Drain.


  3. Remove excess water from slide and blot, so that alcohol used for decolorization is not diluted. Flood slide with 95% alcohol for 10 seconds and wash off with tap water. (Smears that are excessively thick may require longer decolorization. This is the most sensitive and variable step of the procedure, and requires experience to know just how much to decolorize). Drain the slide.


  4. Flood slide with safranin solution and allow to counterstain for 30 seconds. Wash off with tap water. Drain and blot dry with bibulous paper. Do not rub.


  5. All slides of bacteria must be examined under the oil immersion lens.


Note: To remove immersion oil from a slide without damaging the smear, lay a piece of lens tissue on the slide, add a drop or two of xylene and draw the lens tissue across the slide. Repeat if necessary.


Designed & Maintained by David M. Rollins
Copyright © 2000, D.M. Rollins and S.W. Joseph
Revised: August 2000
URL: http://life.umd.edu/classroom/bsci424

Read More......

article : How we know about Aseptic Technique

You will be working with many pathogenic species of bacteria in the laboratory. Therefore, you must learn to use careful aseptic technique at all times, both to protect self, and classmates, and to avoid contaminating cultures.

Remember that bacteria are in the air as well as on skin, the counter, and all objects and equipment that have not been sterilized.

The most important tool for transferring cultures is the wire inoculating needle or loop. It can be quickly sterilized by heating it to red hot in a bunsen burner flame. Adjust the air inlets of the burner so that there is a hotter inner cone and the outer, cooler flame. A dry needle may be sterilized by holding it at a 30o angle in the outer part of the flame. A wet loop with bacteria on it should first be held in the inner part of the flame to avoid spattering, and then heated until red hot in the outer part of the flame. Always flame the loop immediately before and after use! Allow it to cool before picking up an inoculum of bacteria. If the loop spatters in the agar or broth, it is too hot. Hold the loop or wire handle like a pencil.

Read More......

article : Know the General Safety Rules for the Microbial Pathogenesis Laboratory

The microorganisms used for instruction in this course are pathogenic for humans or animals. The safety of every student depends upon the conscientious observation of rules that must be followed by all who work in the laboratory. Certain precautions must be followed to avoid endangering well being, that of neighbors and those who clean the laboratory. Any student who is in doubt about how to handle infectious material should consult an instructor. Laboratory attendance is mandatory. There will be no way to make up missed work. The following rules must be observed at all times.

  1. Always wear a laboratory coat when working in the laboratory classroom.


  2. Put nothing in mouth which may have come in contact with infectious material.


  3. Smoking, eating and drinking in the laboratory are not permitted at any time.


  4. Mouth pipetting is not permitted under any circumstances. Use the safety pipetting devices which are provided. Dispose of used pipettes in the appropriate receptacle. Any infectious material which may accidentally fall from pipettes to the laboratory bench or floor should be covered with a disinfectant and reported to any instructor immediately.


  5. Any spilled or broken containers of culture material should be thoroughly wet down with a disinfectant and then brought to the attention of an instructor. There are no penalties for accidents, provided they are reported promptly.


  6. Report at once an accident which may lead to a laboratory infection.


  7. The microscope issued to you is both an expensive and delicate instrument--treat it accordingly. Always, at the end of each laboratory period, carefully clean oil from the objective and condenser lenses, align the low power dry objective with the condenser and rack condenser up and body tube down. You will be held personally responsible for any defect found on microscope when it is recalled at the semester's end.


  8. When finished for the day, dispose of all used glassware and cultures in the appropriate receptacle, clear workbench and wash the top with a disinfectant. Wash hands thoroughly with soap and water before leaving the laboratory.


  9. Do not throw refuse of any kind into the sink. Use the containers provided.


  10. Be sure all burners are turned off at the end of the laboratory period. Double check to be sure that handles on all gas outlets are in the off position.


  11. The inoculating needle should be heated until red hot before and after use. Always flame needle before you lay it down.


  12. Always place culture tubes of broth or slants in an upright position in a rack. Do not lay them down on the table or lean them on other objects. They may roll onto the floor and break.


  13. All culture containers which are to be incubated should bear the following notations: 1) initials (or last name of the student), 2) specimen (name of organism or number of unknown) and 3) date. When using Petri plates, these notations should be entered on the bottom half, not the lid. Unless otherwise directed, all plates are to be inverted, all plugged tubes should have the plugs firmly set into the tubes, and all screw cap tubes should have the caps loosened one-half turn to permit gas exchange.
Designed & Maintained by David M. Rollins
Copyright © 2000, D.M. Rollins and S.W. Joseph
Revised: August 2000
URL: http://life.umd.edu/classroom/bsci424

Read More......

article : Antibiotic Disk Susceptibilities (Kirby-Bauer Disk-Diffusion Method)

The disk-diffusion method (Kirby-Bauer) is more suitable for routine testing in a clinical laboratory where a large number of isolates are tested for susceptibility to numerous antibiotics. An agar plate is uniformly inoculated with the test organism and a paper disk impregnated with a fixed concentration of an antibiotic is placed on the agar surface. Growth of the organism and diffusion of the antibiotic commence simultaneously resulting in a circular zone of inhibition in which the amount of antibiotic exceeds inhibitory concentrations. The diameter of the inhibition zone is a function of the amount of drug in the disk and susceptibility of the microorganism.
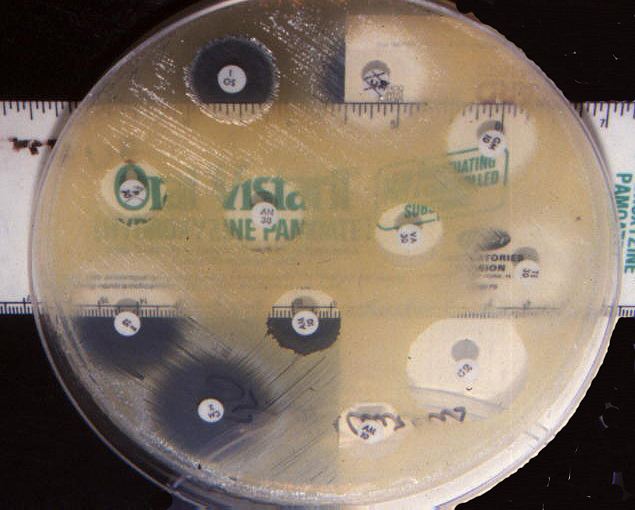
This test must be rigorously standardized since zone size is also dependent on inoculum size, medium composition, temperature of incubation, excess moisture and thickness of the agar. If these conditions are uniform, reproducible tests can be obtained and zone diameter is only a function of the susceptibility of the test organism.

Zone diameter can be correlated with susceptibility as measured by the dilution method. Further correlations using zone diameter allow the designation of an organism as "susceptible", "intermediate", or "resistant" to concentrations of an antibiotic which can be attained in the blood or other body fluids of patients requiring chemotherapy.

Procedure:

  1. Make a suspension at an appropriate turbidity of the bacterial culture to be tested.

  2. Place a sterile cotton swab in the bacterial suspension and remove the excess fluid by pressing and rotating the cotton against the inside of the tube above the fluid level. The swab is streaked in at least three directions over the surface of the Mueller-Hinton agar to obtain uniform growth. A final sweep is made around the rim of the agar. Be sure to streak for confluency.

  3. Allow the plates to dry for five minutes.

  4. Using sterile forceps, place disks containing the following antibiotics on the plate: penicillin G, ampicillin, cephalothin, erythromycin, tetracycline, methicillin, streptomycin or other appropriate antibiotic disks.

  5. Incubate the plates within 15 minutes after applying the disks. The plates should be incubated soon after placing the disks since the test is standardized under conditions where diffusion of the antibiotic and bacterial growth commence at approximately the same time.

  6. Following overnight incubation, measure the diameter of the zone of growth inhibition around each disk to the nearest whole mm. Examine the plates carefully for well-developed colonies within the zone of inhibition.

  7. Using a standard table of antibiotic susceptibilities, determine if the strain is resistant, intermediate, or susceptible to the antibiotics tested.
Designed & Maintained by David M. Rollins
Copyright © 2000, D.M. Rollins and S.W. Joseph
Revised: August 2000
URL: http://life.umd.edu/classroom/bsci424

Read More......

Search by Google

Custom Search
 

Search Engine Optimization - AddMe

Enter your email address:

Delivered by FeedBurner
