Subscribe

RSS Feed (xml)

Powered By

Skin Design:
Free Blogger Skins

Powered by Blogger

Thursday, March 12, 2009

article : Assay of Serum Levels of an Antibiotic

This is a technique for assay of antibiotic levels in blood of patients undergoing antibiotic therapy. Blank paper disks are allowed to absorb sera containing known concentrations of an antibiotic, and then are placed on agar plates previously inoculated to give confluent growth.

The diameter of the zone of inhibition is plotted against antibiotic concentration to give a standard curve. The diameter of the zone of inhibition around the serum sample containing an unknown amount of antibiotic is measured and the antibiotic concentration in this sample is then calculated by reference to the standard curve.

Procedure:
    1. The assay solutions consist of four vials with known concentrations of tetracycline (Tet) and a sample with an unknown concentration of tetracycline (Tet). Each sample will be tested in duplicate.

    2. Using sterile forceps, place ten paper disks in an empty Petri dish in five rows with two disks per row. Using a micropipette, place 0.02 ml of a solution containing 24µg of Tet on the disks in the first row of two.

    Continue as follows:

    • 2nd row--0.02 ml with 12µg of Tet
    • 3rd row--0.02 ml with 6µg of Tet
    • 4th row--0.02 ml with 3µg of Tet
    • 5th row--0.02 ml with an unknown concentration of Tet

    1. Add 0.1 ml of a culture of indicator bacteria (Staphylococcus) to molten Mueller-Hinton medium. After thorough mixing, pour two agar plates and allow them to harden on the bench top.

    2. Make a reference mark on the bottom of the seeded agar plates. Using the template provided, place the disks on the surface of the agar plates using sterile forceps. Gently press the disks onto the agar surface and record the position of each disk in relation to the reference mark. After all disks have been placed on the agar, incubate the two plates at 35oC.

    3. Following overnight incubation, measure the diameter of each zone of inhibition to the nearest whole mm.

    4. Record the zone of inhibition average diameter for each of the disks and refer to standard table for interpretation.

Read More......

article : Streaking for Isolation of Bacterial Colonies on an Agar Medium

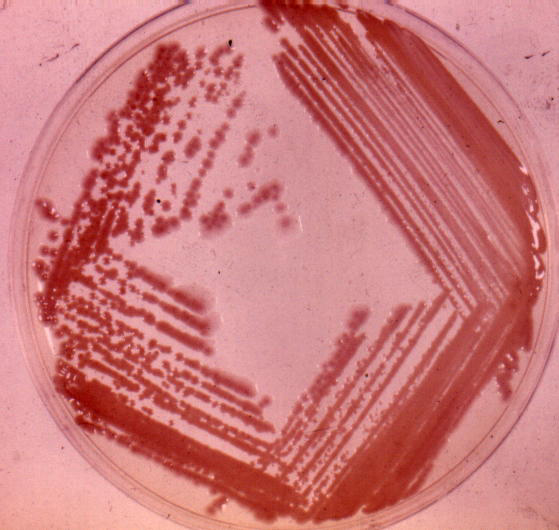
Bacteria in natural circumstances are almost always found as mixtures of many species. For most purposes, it is necessary to isolate the various organisms in pure culture before they can be identified and studied. The most important technique for this purpose is "streaking out" on the surface of a solid nutrient medium, the principle being that a single organism, physically separated from others on the surface of the medium, will multiply and give rise to a localized colony of descendants. It is extremely important that you master this technique:

  • Sterilize a wire loop by heating it until red hot in a flame; allow it to cool for several seconds. Test for coolness by touching the agar at the edge of the plate.
  • Pick up a loopful of liquid inoculum or bacterial growth from the surface of an agar plate and, starting about one inch in from the edge of the plate, streak lightly back and forth with the loop flat, making close, parallel streaks back to the edge of the plate.
  • Sterilize the loop and cool again, then with the edge of the loop, lightly make another set of nearly parallel streaks about 1/8 inch apart, in one direction only, from the inoculated area to one side of the uninoculated area, so that about 1/2 the plate is now covered.
  • Flame and cool the loop again, and make another set of streaks in one direction, perpendicular to and crossing the second set of streaks, but avoiding the first set.
  • Note: A culture taken with a cotton swab (e.g., throat swab) can be rolled and rubbed back and forth across the plate. Streaking from this area is then continued with a wire loop, as above. Alternatively, material from the swab can be suspended in 1 ml of sterile broth, which is then cultured as above. To sample a dry surface (skin, dish, table, etc.), moisten a swab with sterile broth, and then use it to rub the surface. Solid material (soil, food, etc.) should be suspended in a small amount of sterile broth or peptone water, which is then streaked out; or, a dilution series may be made for an accurate count, as in food and water testing.


    Designed & Maintained by David M. Rollins
    Copyright © 2000, D.M. Rollins and S.W. Joseph
    Revised: August 2000
    URL: http://life.umd.edu

    Read More......

    article : Handling Tubes of Broth or Agar Media

    Never lay tubes down on the counter. Always stand tubes in a rack. If you are right-handed, pick the tube up with left hand, and remove the plug or cap with the little finger of right hand, leaving the thumb and other fingers free to hold the inoculating loop or pipette. Do NOT lay the plug down, or touch anything with it. Holding the tube at about a 45o angle, pass the open end of the tube through the bunsen burner flame, remove the growth required with the loop or pipette, flame the lip of the tube again, and replace the plug which you are still holding in the crook of the little finger of right hand.

    Dispose of all old cultures in the proper containers. (See General Rules). Agar plates should not be left in the incubator for more than two days, or they will dry up. When you must save them for a few days, store them in the cold room (see Lab Coordinator). Do not leave old cultures lying about the room.

    Designed & Maintained by David M. Rollins
    Copyright © 2000, D.M. Rollins and S.W. Joseph
    Revised: August 2000
    URL: http://life.umd.edu

    Read More......

    article : Handling Sterile Pipettes

    Remove the sterile pipette carefully from its container (can or paper) when you are ready to use it. Do not put it down. Hold the upper third of the pipette in right hand, and insert into pipetting device, which is used to control the flow of liquid to be measured.

    The top of the pipette must not be chipped, or wet, or it will be hard to control. Leave the little finger free to remove and hold cotton plugs, etc. Contaminated pipettes must be placed in a container of disinfectant solution (lysol), and should be submerged.


    Designed & Maintained by David M. Rollins
    Copyright © 2000, D.M. Rollins and S.W. Joseph
    Revised: August 2000
    URL: http://life.umd.edu

    Read More......

    article : Handling Agar Plates

    Do not remove the lid unnecessarily or for prolonged periods of time. Do not lay the lid down on the counter or put the bottom of the Petri dish into the inverted lid. While inoculating the agar plate, you may either:

    Set the covered plate upside down on the counter. When you are ready to inoculate it with the loop, lift the bottom half (with the media in it), and hold it up vertically for a moment while streaking it. Replace it into the lid while re-flaming the loop. Lift bottom again to continue streaking, etc.

    OR

    Set the plate right side up on the counter. Lift the lid slightly ajar and hold it at an angle, while you are streaking the plate. While this prevents contaminated dust from falling on plate, it may be difficult to see what you are doing.

    Note: Method No. 1 is recommended for examining a plate which has been incubated in an inverted position. Otherwise, water may condense on the lid and drip down onto the medium, causing the colonies to coalesce.


    Designed & Maintained by David M. Rollins
    Copyright © 2000, D.M. Rollins and S.W. Joseph
    Revised: August 2000
    URL: http://life.umd.edu/classroom/bsci424

    Read More......

    Search by Google

    Custom Search
     

    Search Engine Optimization - AddMe

    Enter your email address:

    Delivered by FeedBurner